|
|
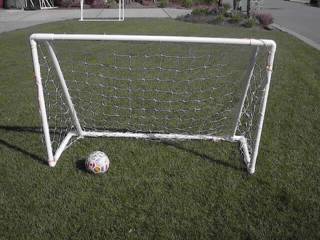
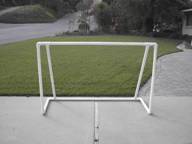
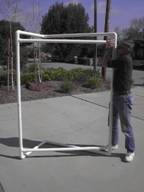
6' x 4' Goal for Small-Sided Soccer or HockeySteve Trimberger The Trimberger Family Foundation Copyright 2003-2006 The Trimberger Family Foundation All rights reserved. AbstractThis document describes the plan and construction of a 6' wide, 4' high soccer goal. The goal is made with plastic PVC pipe. It is low-cost, easy to assemble and light weight. |
Tools
Saw with small teeth (about 0.1'') for cutting pipe
Tape measure
L square
Pliers
Rubber mallet
Masking tape
PVC cement (clear preferred)
Materials
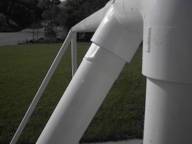
The goal is constructed of 1½” PVC pipe with pipe fittings. The pipe is 1½'' interior dimension. The walls are slightly less than ¼'' thick, so the exterior dimension is just under 2 inches in diameter. The fittings are slightly larger. The pipe fits into the fittings approximately 1¼''. All lengths for pipes assume these sizes. The PVC pipe is better if it is UV-resistant, but this thicker pipe stays reasonably strong.
Components2 Crossbar 5' 2¼'' 2 Back 4' 4½'' 2 Post 3' 9½'' 2 Side 2' 1½'' 4 Joint 2¼'' 4 Tee fittings 6 L fittings Total material cost: about $25. |
|
|
|
AssemblyPVC pipe is normally sold in 10' lengths. One goal requires slightly more than three 10' sections. If you are making more than one goal, you can use the fourth piece for up to four goals. |
||
|
|
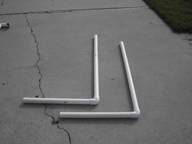
1. Cut pipe into lengths shown. Clear burrs from ends. Note: take care to cut reasonably straight. If you cut at an angle, you might make some dimensions slightly larger accidentally. Deviations of less than ¼'' are tolerable. 2. Cement one Post and one Side into an L fitting. Repeat with the other Post and Side. |
|
|
|
|
3. Dry fit (no
cement!) all components as shown in the diagram. Push all pipe segments into fittings
without cement. Press to hand
tightness, about 1'' into the fittings.
The segments should not fall apart, but need not be seated all the way
into the fittings. Place assembled
goal on a flat surface and ensure that the base pieces lie flat. The purpose of this step is to find the
correct angle of all fittings, particularly the |
|
|
|
|
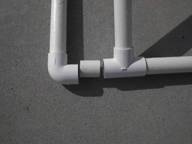
4. One at a time, pull apart the Joint pipe segments (the really small ones at the sides of the crossbar) and remove the Joint segment. You may need the rubber mallet to hammer the pieces apart. You may need the pliers to remove the Joint pipe segment. Leave the Posts, Sides and Back connected and snug. Apply cement to both fittings (the T and the L) on the sides of the Joint and press together. At this time, you are only cementing the Joint pipe. Do not cement the Post or Crossbar pieces. After cementing, the Joint pipe will disappear into the T and L couplings. First do the top two Joints, then lie the goal face-down and do the bottom two Joints. |
|
|
5. With the goal face-down, one at a time, remove each Side piece from its rear L fitting, cement and press together.
6. Stand the goal upright on a flat surface and, one at a time, remove each Post piece from its top L fitting, cement and press together.
7. One at a time,
remove the Back pieces and cement the bottom ends of the Back pieces to the
bottom
|
|
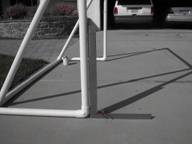
8. Now the task is to square up the front of the goal. Using an L-shaped square as a guide, press the top crossbar down into the back pieces until the front of the goal is square with the ground (or the Side piece). Wrap a piece of masking tape around the topmost visible part of the Back piece, where it enters the Tee connection. |
|
|
|
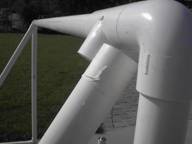
9. One at a time, flex the top of the goal forward to remove the top end of the Back piece from the Tee joint, apply cement to the Tee and press together. The tape on the Back piece should stop the Back from going too far into the Tee. (Alternatively, you may wish to skip the tape and have your goal lean slightly back). |
|
|
10. You may choose to either cement the Crossbars or not. If you choose to cement them, one at a time, detach the Crossbar from each Tee fitting, cement and re-insert. If you choose not to cement them, wait at least five minutes to allow the cement to set, then stand the goal on one side, grab the upper Back piece and hang from it for a few seconds to force the Crossbars deep into the Tee joints. Although your goal is disassemble-able for transportation, it will not come apart easily. You may need a rubber mallet (and some patience) to disassemble it. |
Hints
When cementing, apply cement only to the inside of the fitting. That way, there's less mess from excess cement.
PVC cement is pressure sensitive. Press pieces all the way together in one push.
Don't be surprised if the pipe segments seat about ¼'' deeper after cementing. The measurements are made so the goal is fine after full seating.
Nets
The cheapest nets I found are from http://www.fold-a-goal.com, $40/pair for 4.5x6.5x3 nets. These nets are slightly larger than the goals here, but larger is better than smaller. Shawn at Wakefieldsoft got a single net that fit perfectly for $15.99 online at http://www.epicsoccer.com/. Attach the nets to the goal with velcro net attachments, zip ties or duct tape.
If you know a cheap place to get UV-resistant PVC or netting
in 5' x 11' pieces, let me know.